About this document :This document is not produced or maintained by Sprint Nextel. All information, comments, and opinions are those of the author and should in no way be considered as having any affiliation with Sprint Nextel. The information provided is what was available from public documents and the results of live testing with the Sprint Nextel messaging clients and gateways. None of the features or services described here are officially supported by Sprint Nextel. For details on which features and services described here are supported by Sprint Nextel please visit their web site at: http://www.sprint.com/ or http://developer.sprint.com/
WARNING: Sprint Nextel performed some network upgrades to their iDEN messaging platform early in 2009. There were several changes to features and functionality not included in this document. For a complete list of currently supported messaging features and gateway protocols please refer to their developer web site at http://developer.sprint.com/.
Contents
Introduction
This document was created to help provide an understanding of the Nextel Communications messaging platform capabilities. The first thing one must understand before proceeding is the difference between a "Paging Service" provisioned to a handset and a "Messaging Gateway Protocol" which is available to a developer for integration to a paging service.
A "Paging Service" is defined as a means of delivering a notification and some type of related content to an end user device. Nextel supports 4 basic types of paging services, which are, Short Message Service (SMS, One-Way Messaging), Multi-media Message Service (MMS), Net Alerts and although Nextel "2-Way Messaging" is actually a custom WAP application using Net Alerts for the sake of this discussion it will be considered an additional Paging Service.
A "Messaging Gateway Protocol" is a means for an entity to deliver a request to a carrier's network to use a Paging Service to forward that request to an end user's device. Nextel supports integration to it's paging services using SMTP, SNPP, CGI (XML), TAP, and WAP Notifications (XML). We also support an IVR (Intelligent Voice Response) system for numeric only SMS paging through a touch tone telephone as well as our Voice Mail service.
Now the confusing part, not all Paging Services can be accessed through all Messaging Gateway Protocols. Not all paging services support the same features through all gateway protocols. WAP Notifications, MM7 and CGI transactions are XML POST transactions, CGI also accepts GET transactions. 2-Way Messaging uses a Net Alert but you access it through SNPP. TAP and IVR only send SMS messages. Some of these behave in this manner because that is the way they were defined in the protocol, others it is simply because Nextel chose to implement the functionality in that manner. When Nextel behavior differs from the industry norm I will try to point that out.
Hopefully somewhere in this collection of information you will find the key to understanding how messaging services and protocols are related but not necessarily the same.
Gateway
Protocols |
Paging Services
|
| Short Message Service |
2-Way Messaging |
Multi-Media Message Service |
| Voice Mail |
YES |
NO |
NO |
| IVR |
YES |
NO |
NO |
| TAP |
YES |
NO |
NO |
| SMTP |
YES |
YES |
YES |
| SNPP |
YES |
YES |
YES |
| CGI / XML |
YES |
YES |
YES |
| MM7 |
NO |
NO |
YES |
This table shows which gateway protocols can be used to send messages to each of the Nextel paging services.
| Features |
Paging Services
|
| Short Message Service |
2-Way Messaging |
Multi-Media Message Service |
| Maximum Single Message Size |
140 Characters |
500 Characters |
100 kb w/attachments |
| Delivery Confirmation |
YES |
NO |
NO * |
| Read Confirmation |
NO |
YES |
NO * |
| Mobile Originated Messages |
NO |
YES |
YES |
| Embedded Message Replies |
NO |
YES |
NO |
| Phone Call From Message |
YES |
YES |
YES |
| Direct Connect From Message |
YES |
NO |
YES |
| Hyperlink From Message |
Handset Specific ** |
YES |
YES |
| Attachments |
NO |
NO |
YES |
This table shows which paging services support some of the most common features. There are more details on feature support in each of the service descriptions elsewhere in this document. Remember, not all features are supported by all gateway protocols, refer to both references before deciding which service and protocol to use.
* Note 1 This was supported using SMTP for MMS messages but it was not "officially" supported and therefore was dropped during one of the server updates. Consideration is being given to re-instituting this functionality in the future.
** Note 2 Hyperlinks are supported on BlackBerry handset SMS clients only.
Paging Services
All Nextel users have SMS paging service provisioned on their handset as a basic service.
Nextel's implementation of SMS paging varies slightly from most other carriers. We support a maximum message length of 140 characters and we do not support replies or mobile originated SMS messages. We also do not allow outside entities to communicate directly with our SMSC which means messages can only contain numeric or alpha-numeric information.
NOTE: Messages exceeding the maximum size limitation are broken into smaller messages and sent separately by some of the gateways. This is really a function of the gateway not the device or SMS service.
The SMS content and notification are delivered to a handset simultaneously. Once notified the content is available to be read from the device memory and is stored there until deleted by the user. A user has the ability to make a phone or Direct Connect call to a number embedded in a message. The Nextel Motorola SMS client does not support hyper links but the Nextel BlackBerry SMS client does.
Another key feature of SMS is the fact that it makes use of spare bits on a voice control channel to deliver its payload to a device. This provides the user the ability to receive SMS notifications while he is on a phone call.
Although SMS messages are one way they do support confirmation of delivery. A message is flagged as delivered once it is on the user's device. There is no mechanism for determining whether or not the message was ever actually read by the end user.
Earlier version Nextel handsets had a maximum capacity of 15 messages. All handsets launched in late 2004 and after can hold up to 20 messages. If a new message comes in when the handset is full the user will receive a notification from the server explaining that he must delete some messages from his handset to receive additional messages. If a handset's memory is full, it is off, or out of coverage when a delivery attempt is made the server will attempt to deliver the message for up to one week before considering it undeliverable. The retry algorithm is shown below.
SMS Retry Algorithm
|
| Initial Attempt |
Immediate |
| Retry 1-2 |
1 Minute from last delivery attempt |
| Retry 3-5 |
2 Minutes from last delivery attempt |
| Retry 6-15 |
5 Minutes from last delivery attempt |
| Retry 16-168 |
1 Hour from last delivery attempt |
SMS messages can be sent to a Nextel user through Voice Mail, IVR, TAP, SMTP, SNPP, CGI/XML protocols.
2-Way Messaging, is a custom WAP messaging client built exclusively for Nextel. It is a value added service provided by Nextel for an additional monthly subscription fee. It was designed to be an efficient way of delivering large text messages to an end user device. The overall design and implementation provide all the capabilities of true 2-Way SMS messaging without the overhead on a voice channel. Because it was designed to look like 2-Way SMS it is compatible with most of the paging protocols developers are familiar using with SMS. Although it is technically not 2-Way SMS messaging it is sometimes refered to as that because of the similarities.
Nextel 2-Way Messaging supports up to 500 characters per message. The message content is stored on the server. When a user has a new notification a Net Alert is sent to the device alerting the user of a new message. Then, when the user chooses to view that message his WAP browser will open bringing him to the 2-Way Messaging application inbox. From the inbox a user can select and view his messages through the browser. Messages reside on the server and are only viewable when network coverage is available. Once viewed a message will remain available on the server until it is deleted by the user or the user's allocated storage capacity limit has been reached.
Since 2-Way Messaging data is stored on the server it provides for a much larger capacity of stored information. Messages are not stored by a message count but instead are stored as bytes. A user has up to 1 megabyte of storage available for his messages. If a user exceeds this value the oldest unsaved message will be automatically deleted. Before you see this as a negative condition think about this, a character takes up 2 bytes, a message of the maximum size is 500 characters, multiplied by 2 bytes per character would be 1,000 bytes or approximately 1 kilobyte. This means that for a user's message to be automatically deleted it would mean he had somewhere over 1,000 messages in his inbox. If you are managing that many messages in your inbox you should be considering moving to a BlackBerry messaging solution.
As with all wireless applications there is a likelihood that the end user will be unavailable when the initial message delivery attempt is made. A Text Message notification cannot be received by the user while he is on a telephone or Direct Connect call. The retry algorithm is as follows:
2-Way Messaging Retry Algorithm
|
| Initial Attempt |
Immediate |
| Retry 1-15 |
1 Minute from last delivery attempt |
| Retry 16-25 |
3 Minutes from last delivery attempt |
| Retry 26-50 |
5 Minutes from last delivery attempt |
| Retry 51-99 |
1 Hour from last delivery attempt |
| Retry 100-124 |
8 Hours from last delivery attempt |
As it's name implied, 2-Way Messaging is capable of responding to incoming messages. Up to 6 replies can be embedded into the original message, 9 canned replies can be preprogrammed and stored by the user, and a free form reply can be created by the user in response to a message. Embedded and canned replies can be up to 100 characters in length. A free from reply can be up to maximum outgoing message size which is 500 characters.
Outgoing messages can be sent from the application to any valid email address, any Nextel PTN, or any PTN for a carrier who participates in our inter-carrier messaging program. Nextel also supports "Short Codes" for addressing messages. Outgoing messages can be up to 500 characters in length. Messages can be created free form or taken from a user customizable database of 9 messages. A user cannot attach replies to an outgoing message from his handset.
2-Way Messaging also supports dialing of phone numbers and hyper links from within a message.It does not support Direct Connect.
The status of a 2-Way Message request and replies can be retrieved if they are sent through the SNPP or CGI gateways.
All of the 2-Way Messaging features can be accessed through a standard web browser at Nextel.com. A user can read messages from and manage his inbox. He can also program his canned replies and messages as well as add a signature to be appended to his outgoing messages.
Nextel 2-Way Messages can be sent to a Nextel user through SMTP, SNPP, and CGI/XML protocols.
Net Alerts are an additional Nextel offering for a monthly fee. This capability is included as a feature of NOL Plus service. Net Alerts have also been refered to as HDML push or more properly a Service Indication content type. The terms HDML push, and UP Notify both refer to the Messaging Gateway Protocol used by a developer to send a Net Alert to a device.
Net Alerts deliver a short message title and an embedded URL to a handset through the Openwave WAP Gateway. The actual message content is stored at the customer's or developer's server and is not available on the device until the user chooses to view the message and retrieves the URL. The resulting content is viewed through the handset web browser. This of course means that when the user is out of coverage he has no access to his messages. (Yes, the user can retrieve a message if it is in his browser's cache and the handset is out of coverage but this is highly unreliable and should not be depended upon to be available.)
The content at the destination URL has to be formatted in such a manner that it can be rendered by the end user's device. This means you should use WML or xHTML if the device supports it. The Nextel WAP gateway will convert HTML content into something displayable on the device but the formatting of the output can be somewhat unpredictable.
Since the content is stored on the end user's server the functionality of this service is limited only by the developer's imagination. A back end system can record when a user first views the information and every time he acts upon that message. A WML deck will support limited, phone call links, Nextel Direct Connect links, images, forms, and the list continues, visit the Open Mobile Alliance web site for more information on WAP capabilities and specifications.
Net Alert Retry Algorithm
|
| Initial Attempt |
Immediate |
| Retry 1-15 |
1 Minute from last delivery attempt |
| Retry 16-25 |
3 Minutes from last delivery attempt |
| Retry 26-50 |
5 Minutes from last delivery attempt |
| Retry 51-99 |
1 Hour from last delivery attempt |
| Retry 100-124 |
8 Hours from last delivery attempt |
Net Alerts can only be sent to a user using the UP Notify XML post.
Multi-Media Messaging is a Nextel paging service available for an additional monthly fee. It will require a device built with an MMS client, I have not listed the models here so this document would not quickly become dated, please refer to the Nextel web site for a complete list of supported handsets. MMS and 2-Way Messaging are mutually exclusive meaning you can only use one or the other on a particular device.
MMS is feature rich paging service capable of receiving text messages up to 500 characters in length as well as image and audio attachments. Supported content types can be sent in a series of "slides" which can be played back on the user's device as a moving picture show with audio and captioning. The maximum total size of the attachments must be lower than 100 kb or they will stripped off the message until the size restriction is met.
With MMS users can send, receive, forward, and reply to messages. The current implementation of MMS by Nextel does not support Inter-Carrier Messages with attachments, only the text of the message will be sent along with a link to download the content from a web site.
The MMS client on the device works similar to a Net Alert, a short title consisting of the sender's address and the message subject, along with an embedded URL to retrieve the message from are sent to the device. Once the user chooses to view the message it is retrieved from the server and stored locally on the handset. The message will remain on the handset until the user deletes it. Please note that for security reasons swapping a SIM in the device will also delete any existing MMS messages and saved media files.
MMS messages can be sent to a Nextel user through SMTP, SNPP, and CGI/XML protocols. The MM7 protocol will be opened to developers for use soon.
Messaging Gateway Protocols
The Intelligent Voice Response system, IVR, is a DTMF dial access paging terminal which provides optional voice prompts to step a user through the transaction. The IVR will only send numeric SMS messages of up to 20 characters in length.
To access the terminal simply dial the area code and exchange of any Nextel user followed by the numbers corresponding to the word "PAGE" (7243). You can use whichever Nextel area code and exchange you find most cost effective to access any Nextel handset. When the terminal answers it is in voice prompt mode by default, if you wish to perform a manual transaction follow the instructions as provided by the operator. If you wish to perform an automated transaction follow the instructions below.
The IVR system supports what is known as a "STREAM MESSAGE" format which simply means you can disable the voice prompts to perform an automated transaction. To disable the voice prompts simply dial "00" at the start of the transaction. This is commonly used by enterprise customer's who have an internal voice mail system that they wish to alert Nextel devices from.
For example, to send a page to 703-555-1234 (Nextel Phone Number) with a call back number of 703-555-6245
| First dial any local access number you may need for an outside line. |
LOCAL_SYSTEM_CHARACTERS - 9 (if required for an outside line.) |
| Then enter the United States country code if required. |
US_COUNTRY_CODE - 1 (if required.) |
| Then dial the access number for your nearest IVR server. Whether or not you need the area code is determined by your telephone service provider. (I used Boston for this example.) |
AREA_CODE-EXCHANGE-PAGE - 617-839-7243 |
| You will need to add a pause to allow for enough time for the connection to be established, one or two pause characters are usually enough. The system I originally wrote this script for used the comma character as a pause indicator, your system may be different. |
PAUSE - ,, |
| Once the line answers enter the STREAM MESSAGE delimiter. |
STREAM_MSG_DELIMITER - 00 |
| Then we need to PTN to send the page to. |
PTN_TO_PAGE - 7035551234 |
| Next comes the call back number. |
CALLBACK_NUMBER - 7035556245 |
| Entering the '#' key twice at the end of the transaction signals the system that the input is completed and sends the message. |
TRANSACTION_TERMINATOR - ## |
| Then add any characters necessary to disconnect the local system. Again, the system I wrote this for used an uppercase letter H, other systems may vary. |
LOCAL_SYSTEM_TERMINATOR - H |
| So, the whole transaction would look something like this: |
916178397243,,0070355512347035556245##H |
OK, so voice mail is probably not really a Messaging Gateway Protocol, but it is a means of accessing the Nextel network to cause a page to be sent to a handset so it at least deserves some consideration. Voice mail can be used to initiate SMS numeric or SMS voice message notifications only.
The basic functionality of a Voice Mail notification is pretty simple, you call the user, leave a message, and the system sends an SMS page to the user. There are also some extended features you should be aware of that will meet certain unusual customer requirements.
First of all you can dial into the main Voice Mail server by calling NPA-NXX-MAIL (AREA_CODE-EXCHANGE-6245). Now you can access any user's mailbox associated with that area code and exchange, leave a message for a user, press the '#' key and enter another user's mailbox. This can be very handy for automated voice notification system that have to distribute the same message to several users.
The other feature of Voice Mail most user's are not aware of is the ability to send a numeric message from a Voice Mailbox. After accessing a user's mailbox entering a '1' on the keypad will provide access to a system allowing you to input a call back number. This is not the same IVR system referenced elsewhere in this document, it is part of the Voice Mail system and is completely independent. The reason this point is important is because this is a viable alternative to the IVR system. I have had experience with some customer's whose Voice Mail systems were unable to interact reliably with our IVR use the Voice Mail Numeric Message interface to send messages.
It works like this:
| First dial any local access number you may need for an outside line. |
LOCAL_SYSTEM_CHARACTERS - 9 (if required for an outside line.) |
| Then enter the United States country code if required. |
US_COUNTRY_CODE - 1 (if required.) |
| Then dial the access number for the main Voice Mail server. (I used Boston for this example.) |
AREA_CODE-EXCHANGE-MAIL - 617-839-6245 |
| If you are programming this into an automated system you will need to program a pause to wait for the line to answer. One or two pause characters are usually enough. The system I originally wrote this script for used the comma character as a pause indicator, your system may be different. |
PAUSE - ,, |
| Then we need to PTN to send the page to. |
PTN_TO_PAGE - 617839xxxx |
| Then activate the numeric entry mode. |
ACTIVATE_NUMERIC_ENTRY - 1 |
| Enter the numeric message or call back number. |
CALL_BACK_NUMBER - 6175551212 |
| Entering the '#' key twice at the end of the transaction signals the system that the input is completed and sends the message. It is not required but it is the recommended exit procedure from the transaction. |
TRANSACTION_TERMINATOR - ## (Not Required) |
| Then add any characters necessary to disconnect the local system. Again, the system I wrote this for used an uppercase letter H, other systems may vary. |
LOCAL_SYSTEM_TERMINATOR - H |
| So, the whole transaction would look something like this: |
916178396245,,617839xxxx,16175551212##H |
Please note that unlike the IVR not all users can be accessed from all area codes and exchanges. If you plan on using this feature you should use the area code and exchange that matches the PTN of the end user for each transaction.
TAP is an old standard for sending pages to a carrier's network. It is a dial up service in which your "paging terminal" accesses a phone line through a modem, connects to a Nextel server, and performs a transaction to send an SMS text message to a handset. The extended part refers to the addition of support for determining the delivery status of the message. The IXO protocol is simply what TAP was called before it was called TAP.
Nextel's implementation of TAP only sends pages using the SMS paging service. There is no limit on the number of pages per session on a connection to a TAP server but 20 is the recommended maximum. The TAP server accepts messages up to 1,000 characters in length an breaks them into 140 character chunks which is the maximum message size for a Nextel SMS client. All breaks in the message text are performed at a space character. The TAP server also supports confirmation of delivery of messages.
The usefulness of TAP has been pretty much minimized with the popularity of always on Internet connections and the availability of SNPP and SMTP gateways from most paging service providers. It is still a very reliable back up system especially if you are trying to send a page to your IT manager telling him the Internet connection at your office has failed. Also inside many government and public safety agencies you will find the old Motorola Alpha-Mate paging terminals still in use.
All TAP software has a pretty similar set up process. You simply enter the set up mode and configure one or more carriers that you want to access to, then add a user to the system and assign him to a carrier. The carrier configuration consists of programming the access number to the carrier's system and setting up the modem parameters so you can communicate properly with the remote system. The user configuration consists of entering an identifying name for the user and his pager's PIN number or in the case of Nextel, his 10 digit phone number.
Nextel TAP Configuration Parameters
|
| Access number: |
Take your 10 digit Nextel phone number and replace the last 4 digits with 6683. For example if your phone number is 703-555-8888 your access number is 703-555-6683. If required, include the area code in your access number. You can use which ever Nextel TAP access number is most cost effective for your modem's dialing plan to page any Nextel user whether or not his area code and exchange match the one of the TAP modem you dialed. |
| Baud rate: |
1200, 2400, 9600 |
| Modem Standard: |
CCITT |
| Data Bits: |
7 data bits 1 stop bit |
| Parity: |
Even |
| Flow Control: |
XON/XOFF |
| Duplex: |
Full duplex |
| Message length: |
280 characters ** |
| ** Messages over 140 and up to 280 characters will be sent as 2 separate pages. |
TAP is a fairly simple command and response protocol once the connection is set up. A TAP session can be established using Hyper Terminal and your computer's modem as shown below.
Figure 1
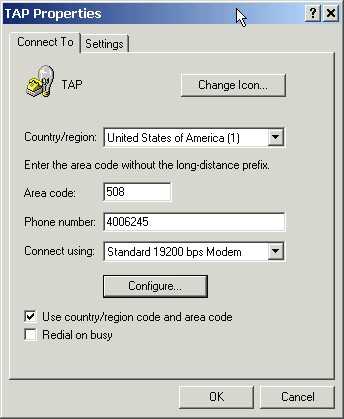 |
First open your Hyper Terminal application. It will prompt you to provide a name for the connection, enter TAP or some other name as appropriate. Then you will be prompted for the phone number to be dialed, enter your local Nextel area code and exchange followed by 6683 (NOTE). Next, Hyper Terminal will ask if you want to dial the connection now, click the Cancel button for now because we still have some settings to change. After canceling the dial process, on the Menu bar, click on File->Properties to display the properties box shown in Figure 1. Select the modem you wish to use from the "Connect Using:" drop down list. Then click on the "Configure" button.
|
The modem configuration dialog box is shown in figure 2. Set the "Port Speed" (baud rate) to 9600. If you experience difficulties establishing a connection later try using a lower speed but for now try using 9600. Then set the "Flow Control" to "Hardware". Now select the "Advanced" settings tab. |
Figure 2
 |
Figure 3
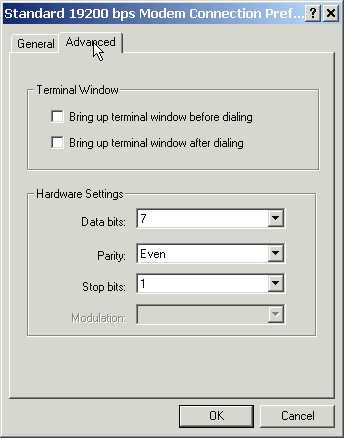 |
The "Terminal Window" settings are not really a functional part of the set up. Under normal conditions you will not want to bring up the terminal window at all. If you are not properly connecting to the destination modem you can check the box to bring up the terminal window before dialing. This will cause you to be prompted for each action in the connection process and it displays the results in the window. This can be very handy for troubleshooting but is not really needed for everyday transactions. In the "Hardware Settings" set the Data Bits to 7, Parity to Even, and Stop Bits to 1. Now you are all through configuring the modem, click the OK button to save your settings and go back to the connection properties window. |
In the connection properties window select the "Advanced" tab. The first setting controls how your keyboard will interact with the terminal during a session. If you check the Terminal keys box the function, arrows, and control keys on your keyboard will be sent through the terminal connection to the remote server, the Windows keys check box will cause the keys to affect your local system only. This setting really does not really affect our TAP transaction at all but I usually check the Terminal keys box. The next setting controls what characters are sent to the remote host when the backspace key is pressed. The Nextel TAP server is looking for "Control H" as the backspace character. The terminal emulation should be set to VT100. Some of the others will also work, you can experiment if you are feeling adventurous. The Terminal Setup button will pop up a window allowing you to control how information is displayed, the default settings will be fine. The Telnet terminal ID was set automatically when you selected the Terminal Emulation and the Back scroll Buffer lines defines how many lines of the transaction you will be able to scroll backwards through. |
Figure 4
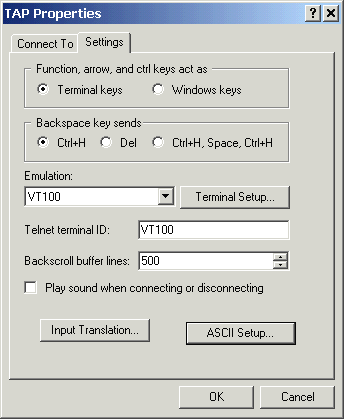 |
Figure 5
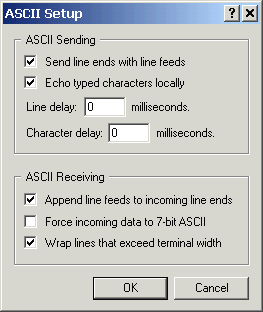 |
The Input Translation can be left at its default setting. Click on ASCII setup to open the window shown in Figure 5. Make sure that "Send line ends with line feeds" is checked. This causes the terminal to send a carriage return and new line character at the end of each line instead of just a new line character. You should un-check the box to "Echo typed characters locally" since the server echoes them back already if you do not you will get all your characters displayed twice. It won't affect operation but it will be very confusing to look at. Now click the OK button on the ASCII set up window and then on the Properties window to bring you back to the main application. |
If you followed these instructions properly and you have a phone line connected to your modem you should now be able to dial into the TAP server. On the menu bar click on Call->Call. This will start the dialing process. Keep pressing your enter key every second or so until the server responds with "ID=", when it does type a capital letter M and press enter, do not worry that you cannot see the letter when you typed it, this is the only exchange that the server will not echo back to you.
The terminal should now be in manual input mode. It will prompt you to "Enter Device ID", type the destination user's PTN and press enter. Then you will be prompted to "Enter Message", type the desired message content and press the enter key. The system will now respond with either an accepted message or a rejected message with a description of the reason for rejection. This will be followed by a prompt asking if you would like to send more pages, type Y for yes or N to disconnect from the system. The complete transaction is shown in the frame below, the green text is what was sent from the server and the red text is what was sent to the server.
id=
M
Enter Device ID:
617839xxxx
Enter Message:
This is a test through the TAP server.
Message send successful - message submitted for processing
More Pages?
N
Thank You - Good Bye |
footnote: Motorola no longer manufactures the Alpha-Mate paging terminal product. If you have a need for such a device a similar model is still manufactured by a company called Canamex. Canamex headquarters is in Markham, Ontario, Canada with US offices in Manhattan.
Simple Network Paging Protocol SNPP
Simple Network Paging Protocol as defined in the IETF document RFC 1861 was created to be a connection between the Internet and existing paging servers. It is a simple command and response protocol used to communicate with a paging service through a socket connection over the Internet.
Nextel supports outgoing messages to SMS, 2-Way Messaging, and MMS Paging Services through SNPP. Nextel also supports message delivery status indications for SMS and 2-Way Messaging, and reply content queries for 2-Way Messaging. The Nextel SNPP gateway also supports inserting embedded replies into Nextel 2-Way Messages, replies can be directed to an email address or another handset using the "CALLerid" command which will be explained later. On services which do not support embedded replies the replies are listed at the bottom of the message text. The SNPP gateway will accept messages of up to 1,000 characters in length and deliver them to the appropriate Paging Service in segments small enough to match the maximum message size for that service.
Most SNPP software available today has a similar set up process as described in the TAP section, you set up a carrier's parameters then you add a user and assign him to that carrier. The parameters to configure software for the Nextel SNPP gateways are
Server: SNPP.Nextel.com
Port: 444
Nextel does not provide a secure port for SNPP transactions. In cases where this is the first time a business is deploying an SNPP application they may have to open their firewall for outgoing connections to snpp.nextel.com.
Using the gateway specified above will process all messages to all users regardless of their Paging Service. The server will look up the user's provisioning and send the message via the most cost effective means for the end user. There are occasions when some users want to ensure a message is delivered as an SMS message, mainly because of the advantage of the notification being received during a voice call, in this case the server address of:
MSNSNPP.Nextel.com
should be used. A brief history lesson, we used to support 3 other names for SNPP transactions, lagrange.nextel.com has been discontinued for quite a while now and pecos.nextel.com and boerne.nextel.com are planned to be discontinued. If any of these addresses are still in use they should be updated imediately.
SNPP Commands
The example below is a complete list of supported SNPP commands and their possible responses. All commands sent to the server are in red all responses from the server are green, all gray lines of text are comments added by me to help describe the process. Each command sent has only one response, this example shows all possible responses for each command.
The command syntax is type the command, then a space and the command parameter if supported by that command. Only the first 4 characters of the command are valid and they are not case sensitive, meaning that PAGEr, pAge, pagerIWantToAlert will all be interpreted the same by the gateway. Responses from the gateway are always a 3 digit code followed by a textual description of the response. The 3 digit codes are defined in the RFC 1861 specification and can be relied upon to remain consistent, the textual description is up to the imagination of the developer of the gateway software and cannot be expected to remain consistent. Only the first 3 characters of the response should be used to determine the status of the previous command. The only exception to this is when trapping a claim check from the SEND command or when the server is queried for a reply which contains the text of the reply in the response from the server.
The first step in an SNPP transaction is to open a connection to the server. If you are not familiar with using you Telnet client please review the basic Telnet instructions here before proceeding.
Sample SNPP Transaction
|
| First open the connection to the server. |
| telnet snpp.nextel.com 444 |
| This response is actually generated by the Telnet client. |
| Connecting To snpp.nextel.com... |
| If you connect properly the response should look like this. |
| 220 SNPP Gateway Ready |
| If the connection fails your Telnet client will notify you. This is usually caused by port 444 not being open on the client firewall. |
| Could not open a connection to host on port 444 : Connect failed. |
| The 2WAY command is required if you intend to query the server for message status later. It is also required if you want to embed or redirect replies. |
| 2WAY |
| 250 OK, Beginning 2-Way Transaction |
| The CALLerid command is optional and only has an effect if you used the 2WAY command. For a 2WAY transaction if you use the CALLerid command followed by an email address or a PTN replies will be sent to that destination. |
| CALLerid somebody@nowhere.com |
| 250 OK, Message Caller ID Accepted |
| Next we need to send the PAGErid command. |
| PAGErid 6175551212 |
| A unit which supports SMS messaging only will produce a response code of 250 followed by a statement explaining that the handset is only one-way capable. Although it sounds like the server is telling you this will not work, a 2WAY transaction is the only way to determine message delivery status later. This is also the response you will receive if using the MSNSNPP server. |
| 250 Pager ID Accepted, but Unit is only one-way capable |
| For a user provisioned with 2-Way Messaging or MMS the server will respond a code 850. |
| 850 Two-Way Unit Online and Available; Transaction Accepted |
| If the pager ID is invalid the server will return a 550 response. |
| 550 Error, Invalid Pager ID |
| The SUBJect command is optional. For an SMS or 2-Way message the subject text will preceed the message body. The MMS client supports a separate subject line on the user interface. |
| SUBJect Message Example |
| 250 OK, Message Subject Accepted |
| There are 2 ways to add message text to the transaction. The MESSage command and the DATA command. The MESSage command can be used for a transaction in which you can control the input of a "newline" character (the Enter key on your keyboard). The DATA command is used for sending multiple lines of text. |
| MESSage This is a single line of text. |
| 250 Message OK |
| Or using the DATA command. |
| DATA |
| 354 Begin Input; End with <CRLF>'.'<CRLF> |
| This is |
| a message with |
| multiple lines of text |
| terminate with a . character on its own line. |
| . |
| 250 Message OK |
| The HOLDuntil command is optional, it will delay delivery of the message until the specified time. This command must be used with caution, the system will only store the message for seven days so you cannot set a delivery date longer than that or the message will be purged from the system prior to the delivery date. The syntax for the HOLD command is the command followed by a space followed by the delivery date desired. The delivery date is formatted with the last 2 digits of the year, followed by the 2 digit month, followed by the 2 digit day, followed by 2 digits for hours, then 2 digits for minutes (YYMMDDHHmm). You can optionally specify the time zone you were refering to when you entered the date of delivery by adding the GMT offset. If the offset is omitted the server will assume you meant it's local time, currently EST but this is not guaranteed. |
| HOLDuntil 0504221204 -0400 |
| 250 OK, Delayed Messaging Selected |
| Send the "SEND" command to the gateway. |
| SEND |
| If you did not use the 2WAY command at the start of the transaction SEND will produce a 250 response code. |
| 250 Message Sent Successfully |
| For a 2WAY transaction you should receive a code 960 followed by the 10 digit PTN followed by the claim check number for the transaction. The PTN and claim check should be captured to use for a status query on the transaction. |
| 960 6175551212 1253447960 OK, Message accepted for Delivery |
| The MSTAtus command followed by the pager ID and claim check will provide the current status of the message delivery or the content of the reply. |
| MSTAtus 6175551212 1253447960 |
| While the message is waiting to be delivered MSTAtus will respond with a code 860. At this time there is no support for status queries on MMS provisioned handsets, an MMS client will always report that the message is waiting to be delivered regardless of the actual status of the message. |
| 860 3 20041201112130-0500 Message accepted for delivery |
| On a one-way only device when the message has been delivered to the device a status query will respond with a code 861. On a 2-Way Messaging device the message will remain 860 until the user actually reads the message, then it will return an 861 code. |
| 861 4 20041201112843-0500 Delivered, Awaiting Reply |
| On services supporting replies such as 2-Way Messaging the most recent reply will be returned to an MSTAtus command. The time stamp provided is the time stamp of the query, not the time the reply was sent. |
| 889 5 20041201105812-0500 This is the first reply. |
You can send more than one page transaction per session. Although there is no defined limit all Nextel documentation states that the limit on a group page is 20 handsets, if a limit is ever implemented that is the number that should be expected.
At the end of a session it is important to terminate the connection as quickly as possible to free up resources for other users. To terminate the session and close all connections send the QUIT command. |
| QUIT |
| 221 OK, Goodbye |
| There are a few other commands and responses you should be aware of. First is the RESEt command. This can be used at any time during a transaction, it clears all data from the current transaction. It should also be used in response to a 5xx error code. |
| RESEt |
| 250 RESET OK |
| A response code of 421 is fatal to the connection. It is sent from the gateway in the event that an interface is sending too many errors or if there is some other problem with the gateway processing the transaction. Once the 421 code is sent the connection cannot be re-established until a short wait time of approximately one second. This is to help reduce the possibility of issues from runaway applications and spammers. Although not specified previously a 421 is a possible response from any command. |
| 421 Too Many Errors, Goodbye |
| 421 Gateway Service Unavailable |
| A 554 response code is also always possible, this is used for general non-fatal errors in the transaction. |
| 554 Error, failed |
| The HELP command will cause the terminal to output a list of SNPP commands. Not all the commands reported back are supported. Showing you the response here would be a waste of time and effort, try this on your own. |
| Unsupported SNPP Commands |
| The following commands are not supported by the Nextel SNPP gateway. Using them will produce a code 5xx non-fatal response. |
| LOGIn <userid> <password> |
| ALERt <alert override:<0|1> |
| LOGIn <userid> <password> |
| ACKRead <0|1> |
| RType <NONE|YESNO|SIMREPLY|MULTICHOICE|TEXT> |
Nextel offers a web based paging application on their public web site at Nextel.com. Due to the popularity of scraping this application to create custom paging interfaces Nextel now provides an approved API which can be used by developers to create a reliable interface without limiting Nextel's flexibility to make changes to their web site. The application is refered to as "iPageExt.dll".
Being a web based application iPageExt.dll uses simple HTTP 1.1 "POST" or "GET" methods on port 80 to send pages and get delivery status updates. This means one can generally deploy an application without having to worry about convincing their IT department to open another port on the firewall. The other advantage is that any developer who knows how to create an HTML form can create a robust custom paging application for their company.
CGI sendPage Example
|
| This is the base URL for the paging application, it accepts either get or post methods. |
| http://messaging.nextel.com/cgi/iPageExt.dll?cmd=sendPage |
| There are 2 parameters for entering PTNs. You can use either oneWayPTNs for SMS only devices or you use twoWayPTNs for MMS and 2-Way Messaging users. You can page up to 20 units maximum per transaction, enter multiple PTNs separated by spaces. It does not matter if you assign the PTN as oneWay or twoWay, the server will direct the message to the appropriate service anyway but the replies will be dropped from users whose PTNs are designated as oneWayPTNs. |
| oneWayPTNs=NPANXX1231 NPANXX1232 NPANXX1233 |
| twoWayPTNs=NPANXX1234 NPANXX1235 NPANXX1236 |
| The message parameter as one might expect is where the content of the message goes. The maximum allowed message size for an SMS user is 280 characters which sends 2 pages to the end user, 2-Way Messaging and MMS users can accept messages up to 500 characters in length. If you send a page to users with mixed provisioning the message will be truncated to the maximum value for the end user's paging service. |
| message=This is the text that will be displayed in the message to the user. |
| The remaining parameters are all optional. |
| The subject parameter adds a subject line to the message. How this appears on the device is service dependent. |
| subject=Demo Message |
| You can attach up to six embedded replies to a message. Each reply can be up to 100 characters in length. |
| rep1=This is the first reply. |
| rep2=This is the second reply. |
| rep3=This is the third reply. |
| rep4=This is getting redundant. |
| rep5=This is another reply. |
| rep6=This is the last reply. |
| There are two types of reply to addresses. The replyNumber is used to enter a Nextel PTN to send the replies to and the replyemail is used to send the reply to any valid email address. The two parameters are mutually exclusive, if you enter a replyNumber the replyemail address is ignored. |
| replynumber=NPANXX4321 |
| Or... |
| replyemail=some.person@example.com |
| The confirmp parameter is used in conjunction with the replyNumber and replyemail parameters. If set to yes a confirmation of delivery notification will be sent to the reply address. Caution, any value used here will be interpreted as true, this parameter should not be included in your request if it is not used. |
| confirmp=true |
| The xmlout parameter is used to request that the server return an XML formatted response to this request as opposed to serving the web page response. If you intend parsing the response you should use the xmlout parameter, there is no guarantee of consistency in a non-xml response. Like the confirmp parameter any value used here will be interpreted as true. |
| xmlout=true |
| The XML response to a sendPage command is shown below. |
<?xml version="1.0" encoding="ISO-8859-1" ?>
<sendPage Command="pageStatus" Extension="/cgi/iPageExt.dll" Claimcheck="42653">
<pageRcpt>NPANXX1234</pageRcpt>
<pageRcpt>NPANXX1235</pageRcpt>
<pageRcpt>NPANXX1236</pageRcpt>
<pageFrom>NPANXX4321</pageFrom>
<pageSubject>Demo Message</pageSubject>
<pageText>This is the text that will be displayed in the message to the user.</pageText>
</sendPage> |
CGI pageStatus Example
|
| This is the base URL for a status inquiry. |
| http://messaging.nextel.com/cgi/iPageExt.dll?cmd=pageStatus |
| One or more of the PTNs from the original message request need to be sent with the status inquiry. |
phone1=NPANXX1234
phone2=NPANXX1231
phone3=NPANXX1235 |
| And the claimCheck from the original response. |
| claimCheck=42653 |
| This seems kind of redundant but you do need to specify the StatusCheck parameter. |
| StatusCheck=yes |
| And to ensure a consistently formatted response we need to specify the xmlout parameter. |
| xmlout=yes |
| The response from a status query will look similar to this. |
| <?xml version="1.0" encoding="ISO-8859-1" ?> |
| <pageStatus Command="pageStatus" Extension="/cgi/iPageExt.dll" Claimcheck="42653"> |
| This receipt is from an MMS provisioned handset. There is currently no means of determining delivery status or retrieving replies through CGI for MMS users. |
| <pageRcptStatus Rcpt="NPANXX1234" Time="Fri, 29 Apr 2005 12:11:07" Status="Accepted" /> |
| For an SMS user the message will be marked as delivered as soon as it is received by the handset, until then it's status will appear as Sent. |
| <pageRcptStatus Rcpt="NPANXX1231" Time="Fri, 29 Apr 2005 12:14:02" Status="Delivered" /> |
| For a 2-Way Messaging user the message will appear as Sent until it is actually read by the end user. If there is a reply it will be shown inside the status tag. |
<pageRcptStatus Rcpt="NPANXX1235" Time="Fri, 29 Apr 2005 12:55:55" Status="Read" Subject="RE:Demo Message">
Way cool! In Reply To Your Message This is a Test Message
</pageRcptStatus> |
| </pageStatus> |
Note: You must use an HTTP 1.1 formatted request or the transaction will result in a server error 5xx being returned.
The easiest way to explain this is to separate the term "email" from the protocol used by email to send messages which is SMTP.
All Nextel handsets accept pages via �the email address phone-number@messaging.nextel.com. The server will look up the user and deliver the message to the handset using the prefered method of delivery for the user, meaning an MMS user will get the message via MMS, a 2-Way Messaging user will receive a 2-Way Message and an SMS only user will receive a One-Way SMS message. An SMS message delivery can be forced to a premium service user by using the address phone-number@page.nextel.com.
Email
Email is that handy client you use to send messages to your friends and business associates over the Internet. Since all Nextel handsets have an email address associated with their paging service you can simply use an email client with all it's features to send pages to Nextel handsets.
To send a page though email simply address the message to the Nextel user, phone_number@messaging.nextel.com, then enter a subject line if desired. Then enter the text of the message, the total length of the message content should not exceed the maximum length of a single message for the type of paging service the end user is provisioned with, messages of excessive length are truncated. If you want to add embedded replies to the message, start a new line of text with two tilde characters (˜˜) followed by the desired reply text. There is no support for delivery receipts through email paging.
If you are emailing an MMS user you can attach supported content such as image or audio files to the message as well. It is important to note that image and audio attachments must be attached and not embedded in an HTML formatted message to display properly on an MMS handset client.
That is pretty much it, just press send and the user magically receives his message. If the receiving device has a service which supports replies the user can send replies directly back tour email address or whatever reply to address you may have specified.
SMTP
Simple Message Transfer Protocol RFC 821 and RFC 822 is the standard protocol for sending email messages. It is a simple command and response protocol used to communicate with an email service through a socket connection over the Internet. SMTP is the underlying protocol used by your email client to send mail.
There are two mail gateway addresses which can be used for an SMTP transaction. They are messaging.nextel.com for all normal transactions, or page.nextel.com if you are trying to force SMS delivery of a message to a premium paging service user. Previously you could connect to either gateway to send pages to both addresses but this is no longer supported.
The command syntax for an SMTP transaction is to type the command followed by a space, followed by the command parameter. There are really only three commands in an SMTP transaction, they are MAIL, RCPT, and DATA. Two additional commands are used for opening and terminating a session, HELO and QUIT. Commands are not case sensitive but there is more to entering a command than the command itself as you will see below. Responses to commands are a three digit code followed by a description of the response. This is not a complete summary of the SMTP protocol, it is a summary of the commands required to send a page. For more details you should refer to the RFC.
The first step in an SMTP transaction is to open a connection to the server. If you are not familiar with using you Telnet client please review the basic Telnet instructions here before proceeding.
Sample SMTP Transaction
|
| First open the Telnet connection on port 25. |
| telnet messaging.nextel.com 25 |
| If you connect properly you should see the following response. |
| 220 atlw2ap04.dc.us.nextel.com Airnote Service ready |
| Before the server will acknowledge any commands you must identify yourself using the HELO command. |
| HELO example.com |
| The server will respond with a code 250 followed by it's name and a welcome message. There are several servers in the pool so the server name be different from what is shown here. |
| 250 atlw2ap04.dc.us.nextel.com, pleased to meet you |
| The next command is to identify the sender of the mail. |
| MAIL FROM: somebody@example.com |
| If you provided a valid email address the server will respond with a code 250. |
| 250 Requested mail action okay, completed |
| Next we need to address the message to the recipient. You can execute this command up to twenty times to send a message to multiple recipients. |
| RCPT TO: 6175551234@messaging.nextel.com |
| Again if you provided a valid email address the server will respond with a code 250. |
| 250 Requested mail action okay, completed |
| If the email address is not valid the server will respond with a code 551. This will happen of you try to send to a page.nextel.com address through the messaging.nextel.com server or vice versa. |
| 551 User not local and forwarding not allowed |
| Next comes the DATA command. The DATA command contains the entire message transaction headers and content. |
| DATA |
| 354 Start mail input; end with . |
| Creating the content for the DATA command is similar to creating a POST type HTTP transaction, you have several headers such as Date, Subject, To, Cc, and Reply-To, all of which are optional, followed by a blank line, then the content of the message and any attachments. The Reply-To and Subject headers will add characters to the total message length so be careful how you use them. |
Subject: Message Subject
Reply-To: somebody.else@example.com
This is the body of the message.
It can have multiple lines of text.
To end type a . character on it's own line.
. |
| Once the data input is terminated the message is accepted and processed by the server. |
| 250 Requested mail action okay, completed |
| This is a shared connection so be courteous and disconnect as soon as you are through. |
| QUIT |
| 221 atlw2ap04.dc.us.nextel.com Service closing transmission channel |
| One more very important command is the RSET command. If you need to cancel a transaction or if you have too many errors a RSET will clear all commands from the current transaction in process. |
| RSET |
| 250 Requested mail action okay, completed |
| There are several non-fatal 5xx error codes which can be returned. The most common are: |
| 500 Syntax error, command unrecognized |
| 501 Syntax error in parameters or arguments |
| There are some fatal 4xx error codes which indicate you should execute a RSET command or close the connection and start again. |
| 421 Service not available, closing transmission channel |
| 451 Requested action aborted: error in processing |
UP Notify posts an XML document to the WAP gateway to deliver a Net Alert to a Nextel handset using HTTP through port 4445. UP Notify can only be used to send Net Alerts. It can be used from a command line utility and a DLL provided by Openwave. You can also create your own XML post transaction as shown below to create custom applications.
As with almost any DL transaction this can be accomplished using your Telnet client. If you are not familiar with Telnet please see the brief introduction in the appendix.
Net Alert XML Document Source
|
| First open the connection to the server. |
| telnet atlsnup2.adc.nexteldata.net 4445 |
| You will not see a response from the server, start entering the headers and XML document after the Telnet window opens. The first line of the transaction is the HTTP request. |
| POST /ntfn/add HTTP/1.0 |
| The request is followed by all the headers. First is the ACCEPT header. |
| Accept: text |
| We also need the CONTENT-TYPE header which tells the server what kind of content we are posting to the server. |
| Content-type: application/vnd.uplanet.alert |
| This is a little confusing, we need to set the content length but we have not built the content yet. The content needs to built before the transaction is started, then the length needs to be determined and inserted here. The actual content is the last piece of information sent to the server. |
| Content-Length: 191 |
| This is the version of UP Notify we are using. |
| x-up-upnotifyp-version: upnotifyp/3.0 |
| This header designates the destination handset subscriber ID. |
| x-up-subno: 0000000000-000000_atlsnup2.adc.nexteldata.net |
| This tells the server we want to push this transaction to a device. |
| x-up-ntfn-channel: push |
| This header designates the amount of time the server should attempt to deliver this notification before it is considered expired. A value of "0" will provide the maximum TTL allowed by the server. |
| x-up-ntfn-ttl: 0 |
| The CONTENT-LOCATION header provides the destination URL for the alert. It can be a query string or a static web page, it can be HTTP or HTTPS. Net Alerts also support port specifications so your content does not have to be served on port 80. |
| Content-Location: http://www.icepirate.com/wml/index.wml |
| There needs to be one blank line between the headers and the content for an HTTP transaction. |
| |
| Then comes the actual document. The first line declares that this is an XML version 1.0 document. |
| <?xml version="1.0"?> |
| The next line is the DTD (Document Type Definition) which tells the parser where to find the specification of what is contained in the document tags. |
<!DOCTYPE ALERT PUBLIC
"-//PHONE.COM//DTD ALERT 1.0//EN" "http://www.phone.com/dtd/alert1.xml">
|
| The next line is an XML tag which defines an Alert notification. The LABEL is what is displayed on the end user's handset when it receives the alert. The URGENCY can be set to LOW, MEDIUM, or HIGH, the results of the different values are not the same across all handset models. The recommended value is HIGH which will cause a visible and audible alert at the device when the notification is delivered. |
| <ALERT LABEL = "WAP Test" COUNT = "1" HREF = "" URGENCY = "HIGH" /> |
| And lastly, close the XML document. After typing the closing XML tag press the Enter key twice to end the input. |
| </xml> |
| It may seem odd but a good response is an empty response. If the transaction was successful the server will return an HTTP code 204 with a no content message. |
HTTP/1.0 204 No Content
x-upnotify-response-status: 0
Content-Length: 0
x-up-upnotifyp-version: upnotifyp/3.0 |
| If the transaction fails the server will return an HTTP 4xx error code with a message explaining the error. |
HTTP/1.0 400 Invalid subscriber ID 0000000000-000000_atlsnup2.adc.nexteldata.net
Content-Type: text/html
x-upnotify-response-status: 205
Content-Length: 148
x-up-upnotifyp-version: upnotifyp/3.0
<HTML>
<TITLE>Error</TITLE>
<BODY>
<H1>Error 400: Invalid subscriber ID 0000000000-000000_atlsnup2.adc.nexteldata.net</H1>
</BODY>
</HTML>
|
This interface is not currently supported by Nextel. There are plans to enable integration to this service but the details are not available at this time.
The MM7 protocol defined by the 3GPP is used by a Value Added Service provider (VAS) to deliver content to the Multi-media Message Service Center (MMSC). It is used only for messages intended to be delivered to MMS capable handsets. MM7 supports multi-part messages with text and media attachments.
At it's heart an MM7 transaction is an HTTP POST of an XML document. More specifically a SOAP document. I am not going to provide an explanation of SOAP, if you are not familiar with SOAP please review the information provided from the W3C web site and do not sit next to me on a plane. What I will cover is how MM7 uses SOAP to deliver messages to a gateway (MMSC).
There are 2 types of MM7 transactions. The most basic type is a message containing just text. The other type would be a message containing attachments such as image or audio files, or an MMS (SMIL) slide show which would be a "Multi-Part" message.
| The first line of the transaction is the HTTP POST request. |
| POST /mm7 HTTP/1.0 |
| The next header is the SOAP action which should be an empty string indicating that the action is specified in the URI. |
| SOAPAction: "" |
| This is the authorization header. |
| Authorization: Basic MTY1MDQ4MDgwMDA6ZGV2ZWxvcGVy |
| This header specifies the content length, in order to determine the content length you must build the content before starting the transaction. |
| Content-Length: 12476 |
The content type header has one of two values.
It is either text/xml for a text only message. |
| Content-Type: text/xml |
| Or multi-part/related with a boundary definition for a message containing attachments. |
| Content-Type: multipart/related;boundary="----=_part_2_27296482.1112126426022" |
| The headers must be separated from the content by a blank line. |
| |
| This is start delimiter for the first part of the message. |
| ------=_Part_2_27296482.1112126426022 |
| This is the header for the first part of the multi-part message. The SOAP XML must be the first part in a multi-part transaction |
| Content-Type: text/xml; charset=us-ascii |
| Content-Transfer-Encoding: 7bit |
| The headers must be separated from the content by a blank line. |
| |
| The next lines declare the XML document as defined in the SOAP specification. |
| <?xml version='1.0' ?> |
| <env:Envelope xmlns:env="http://schemas.xmlsoap.org/soap/envelope/"> |
| The SOAP header will contain all the routing and handling information for the message. |
| <env:Header> |
| A unique transaction ID needs to be generated to track this message for future updates. |
<mm7:TransactionID
xmlns:mm7="http://www.3gpp.org/ftp/specs/archive/23_series/23.140/schema/rel-5-mm7-1-3"> |
| -1b889b07:102efe67e1d:-8000icepirate/192.168.1.100 |
| </mm7:TransactionID> |
| Some more SOAP formatting tags. |
| </env:Header> |
| <env:Body> |
| This tag declares the schema for the MMS submit request. |
| <SubmitReq xmlns="http://www.3gpp.org/ftp/Specs/archive/23_series/23.140/schema/REL-5-MM7-1-3"> |
| The MM7 version is required for all MM7 transactions. |
| <MM7Version>5.3.0</MM7Version> |
| This is an ID assigned to the MMS service provider for access to the MMSC. |
| <SenderIdentification> |
| <VASPID>my id</VASPID> |
| </SenderIdentification> |
| This is the addressing tag for the message. |
| <Recipients> |
| <To><Number>16035551212</Number></To> |
| </Recipients> |
| MM7 supports classifying messages as Advertisement, Auto, Informational, and Personal. |
| <MessageClass>Personal</MessageClass> |
| <ExpiryDate>2005-03-31T15:00:21-05:00</ExpiryDate> |
| The SMSC can be requested to generate a delivery report back to the MMS service provider eliminating the need to query for delivery status of a message. |
| <DeliveryReport>true</DeliveryReport> |
| This sets a request for a read reply message. |
| <ReadReply>true</ReadReply> |
| A message can be Low, Medium, or High priority. The actual function of these settings can be device dependent. |
| <Priority>Low</Priority> |
| The subject line is what is displayed on the end user's device when the notification is received. |
| <Subject>A Demo MMS Message</Subject> |
| The distribution indicator controls whether or not the user will be notified when the message is received or if it will be delivered silently. |
| <DistributionIndicator>true</DistributionIndicator> |
| The content location which actually references the attachments. |
| <Content href="cid:generic_content_id" /> |
| Now we close the request, the XML body, and the SOAP envelope. |
| </SubmitReq> |
| </env:Body> |
| </env:Envelope> |
| This is the closing delimiter for the first message part. |
| ------=_Part_2_27296482.1112126426022 |
| This is the declaration of the content type for the second part of the message which contains the attachments. An MM7 message can only have two parts, the first part being the SOAP XML and the second part being the attachment. Multiple attachments are put on a single message by making the attachment another multi-part message. |
| Content-Type: multipart/related; |
| boundary="----=_Part_1_18929195.1112126422658"; |
| I chose a SMIL multi-part message for this example. |
| start="<mms.smil>"; |
| type="application/smil" |
| You should recognize the content ID from the XML. |
| Content-ID: <generic_content_id> |
| A blank line between the headers and the content. |
| |
| The boundary delimiter for the embedded multi-part message. |
| ------=_Part_1_18929195.1112126422658 |
| This first attachment is a plain text file. |
| Content-Type: text/plain; name=test1.txt; charset=us-ascii |
| Content-Transfer-Encoding: 7bit |
| Content-Disposition: attachment; filename=test1.txt |
| Content-ID: <test1.txt> |
| |
| this is a text content file which has just one line |
| |
| ------=_Part_1_18929195.1112126422658 |
| The second attachment was a .gif file, I abbreviated the byte array because it came out a bit large. |
| Content-Type: image/gif; name=relax.gif |
| Content-Transfer-Encoding: base64 |
| Content-Disposition: attachment; filename=relax.gif |
| Content-ID: <relax.gif> |
| |
| R0lGODlhZQBQAPUAAHVPJ///5v/+29zJnU4uF4JbMEtXbf/48f/28sW7trWhaI5rP7isp6WPccSr
ddC4hbmshIJ5bzUXDpmhZNHGwHl+Sp6CVqDCjYCiZGVAH+7ew6ubhoiDgFNEO2VkbZm2ffvx8v/+
8v/88v//8gAAAAAAAAAAAAAAAAAAAAAAAAAAAAAAAAAAAAAAAAAAAAAAAAAAAAAAAAAAAAAAAAAA
AAAAAAAAAAAAAAAAAAAAAAAAAAAAAAAAAAAAAAAAAAAAACH5BAAAAAAALAAAAABlAFAAAAb+QBAI
BAKBQCAQCAQCgUAgEAgEAoFAIBAIBAIhEAgEAoFAIBAIBAKBQCAQCAQCgUAgEIfD4XA4HICHg0gk
EolEIpFIJBKJRKFRKCQSiUQiUSgkEo1CoVAoFBqNQCAQCAQCgUAgEAgEAoFAIBAIBAIBQSAQCAFC
IBAIBAKBQCAQCAQCgUAgEIjDAYE4HA6Hw+FwOBwOIpFIJBKJRCKRSCQKhUKhUWg0AoZCoVAoFAqF
QqNRKDQagUAgEAgEAoFAIBAIBAKBQCAQCAQCgRAIBAKBQCAQCAQCgUAgEAgEAgFEIBCIw+FwOBwO
h8PhIBKJRCKRSCQSiUQikUgkCoVCo9H+aDQajUKh0SgUGo1Go9FoBAKBQCAQCAgCgUAgEAgEAoFA
IBAIBAIhEAgEAoFAIBAIBAKBQCAQCATigEAcEIfD4XA4HEQi0UEkEolEIhFQJAqJQiJRKBQKjUaj
0Wg0GoVGo9FoNBqNRqPRCAQCgUAgEAgEAoFAIBAIBAKBQCAQAoFAIBAIIAKBQCAQCAQCgUAgEAgE
AnE4HA6Hw+FwOIhEIpFIJBKJRKKQSBQahUSj0Wg0Go1Go9FoNBqNRsDRaDQajUajEQgEAoFAIBAI
BAKBECAQAoFAIBAIBAKBQCAQCAQCgUAgEAgEAoFAIBCIw+FwOByAh4NIJBKJRCKRSCT+EolEIpEo
FBqFQqPRaDQajUaj0Wg0Go1Go9FoNBqNRiAQCAQCgUAgEAiEQABBIAQCgUAgEAgEAoFAIBAIBAKB
QCAQCAQCcTgcDofD4XA4HA4ikUgkEolEIpFIJBKJQqFQaDQCjkaj0Wg0Go1Go9FoNBqNRqPRaDQa
|
| ------=_Part_1_18929195.1112126422658 |
| The third attachment is the SMIL. This defines how the content should be displayed on the end user's device. |
| Content-Type: application/smil |
| Content-Transfer-Encoding: 7bit |
| Content-ID: <mms.smil> |
| |
| <?xml version="1.0" encoding="UTF-8"?> |
| <smil> |
| <head> |
| <layout> |
| <root-layout width="100%" height="100%"/> |
| <region id="Text" top="50%" left="0" height="50%" width="100%" fit="hidden"/> |
| <region id="Image" top="0" left="0" height="50%" width="100%" fit="hidden"/> |
| </layout> |
| </head> |
| <body> |
| <par> |
| <img src="cid:relax.gif" region="Image"/> |
| <text src="cid:test1.txt" region="Text"/> |
| </par> |
| </body> |
| </smil> |
| |
| Then comes the closing delimiters for both message parts. |
| ------=_Part_1_18929195.1112126422658-- |
| |
| ------=_Part_2_27296482.1112126426022-- |
| |
| |
| The response to this request would look like this. |
| HTTP/1.1 200 OK |
| Content-length: 712 |
| Content-type: text/xml |
| Connection: close |
| |
| <?xml version="1.0" encoding="UTF-8"?> |
| <E:Envelope xmlns:e="http://schemas.xmlsoap.org/soap/envelope/"
xmlns:s="http://www.w3.org/2001/xmlschema-instance"
xmlns:y="http://www.w3.org/2001/xmlschema"> |
| <E:Header> |
| <ns1:TransactionID
xmlns:ns1="http://www.3gpp.org/ftp/Specs/archive/23_series/23.140/schema/REL-5-MM7-1-3">
-1b889b07:102efe67e1d:-8000icepirate/192.168.1.100 |
| </ns1:TransactionID> |
| </E:Header> |
| <E:Body> |
| <m:SubmitRsp xmlns:m="http://www.3gpp.org/ftp/Specs/archive/23_series/23.140/schema/REL-5-MM7-1-3"> |
| <MM7Version>5.3.0</MM7Version> |
| <Status><StatusCode>1000</StatusCode> |
| <StatusText>MMS brought to you by Openwave</StatusText> |
| </Status> |
| <MessageID>AEJJs9wAAAjcABY+ERZK</MessageID> |
| </m:SubmitRsp> |
| </E:Body> |
| </E:Envelope> |
Appendix
Telnet Primer
Telnet is a handy command line utility available on your system used for connecting to remote systems. To start your Telnet client, if you are using Windows, click on Start->Run, and type "telnet" into the pop up box, then click OK. Alternatively, from a Command Prompt simply type "telnet" into the window and hit your enter key.
Before you begin connecting to the raw Alternatively you should be aware of a few basic commands. Telnet commands are not case sensitive, I used all uppercase letters in commands for clarity only. The most important command to know is "HELP" or the "?" character. Both of these commands will display a list of commands supported by your Telnet client.
Enter the "DISPLAY" command to see the current configuration of your client. The first item on the list should be the escape key, this key combination is used to escape an active session and enter Telnet commands. The other information provided will vary depending upon how your client is currently configured.
The next commands to be concerned with are the "SET" and the "UNSET" commands. As their names would imply these commands are used to set and unset certain operating parameters of the client. If you enter the SET command followed by a question mark (?) or the word help you will be provided back a list of parameters you can change. For the purposes of most of the examples in this collection you should set you parameters as follows:
Setting "LOCAL_ECHO" will cause any typed characters to be displayed in the local window. Some server transactions will echo the characters you type back to you as well, this causes each character to be displayed twice but does not affect the actual data in the transaction. If that occurs simply use the "UNSET" command to turn it off.
SET LOCAL_ECHO
The CRLF configures the client to send a carriage return and line feed when the enter key is pressed. This is required for most transactions.
SET CRLF
The "TERM" parameter sets the prefered terminal emulation type, "VT100" or "ANSI" will work with most connections.
SET TERM ANSI
When you exit Telnet using the "QUIT" command these settings will be saved.
The last two commands you need to get started are "OPEN" and "CLOSE". As you may have guessed these commands are used to open and close connections to remote hosts. The OPEN command is followed by the a space, then the name of the server, and optionally the port number. If you omit the port number a default port 23 for Telnet will be used.
OPEN someserver.example.com 23
Although the "CLOSE" command will close the connection to the remote host most interfaces have their own QUIT command built into them which should be used unless you are trying to close the connection from an escape screen.
Now just a few quick shortcuts to make your life easier. The last Telnet command you entered will automatically be repeated if you press the "F3" key on your computer keyboard. If you press the "F2" key you will be prompted to type the character you want to repeat up to, this can be very handy if you are a sloppy typist. You can also open Telnet to a specific connection from the command line by entering:
telnet someserver.example.com 23
You can use this in Windows shortcuts to create links to frequently used Telnet sites.
That is pretty much it, you are now a Telnet guru and ready to surf the web without a browser! For a list of interesting and cool places to visit using your newly found skills check out http://www.telnet.org/.